
 EN
EN
Ever wondered if wiring a train horn to a push button could be easier? This guide shows you exactly how. It covers gathering your wiring kit, using a relay in your wiring diagram, and step-by-step setup to connect your push button switch. Langir brings 16 years of expertise to every project, so you’ll learn proven methods that work. Solve the headache of messy wiring and boost your vehicle’s sound with clear, simple instructions. Now, get ready to make your train horn installation hassle-free and efficient.
Gathering Your Train Horn Wiring Kit and Tools
Start with a clear menu: identifying components in a standard train horn wiring kit, selecting the right train horn button, and checking essential tools. Next, a guinea level look at the solenoid valve, stainless steel parts, and practical safety gear informed by south sudan standards. These steps set a solid base for wiring the train horn with ease.
Contact Langir for Custom Train Horn Push Button Switches
Identifying Components in a Standard Train Horn Wiring Kit
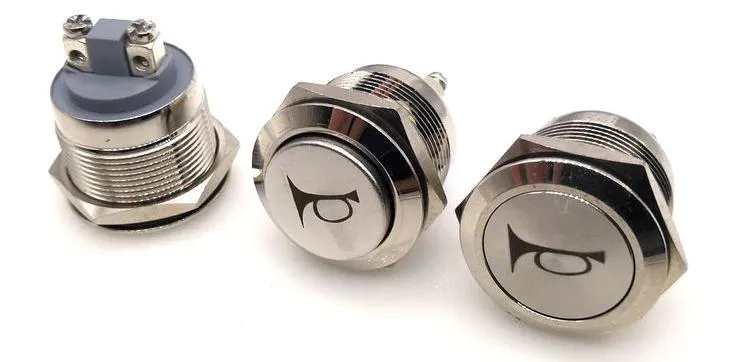
The kit shows a neat lineup of parts like the push button, wiring cables measured in American wire gauge, and extra terminals that connect fast, much like a steering wheel guides a car; every item is clearly marked to simplify the setup and ensures the train horn fires up with the dependability of a Caribbean sunrise lighting up the early morning.
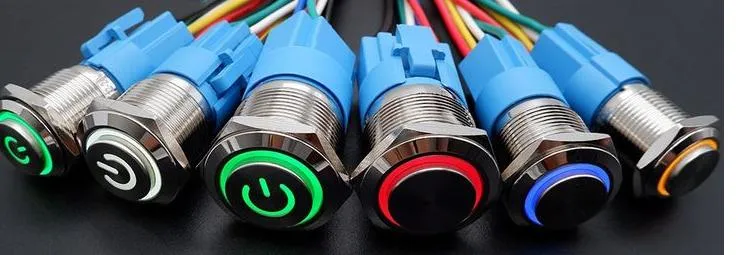
Selecting the Right Train Horn Button or Switch
Picking the right train horn button means choosing a sturdy plastic option that fits your setup perfectly, so this switch not only starts the sound but does it with consistent power, just like a reliable solenoid. With a handy pdf manual at your side and every detail firm as a cart on a solid track, his policy is simple—use parts that work without any confusion.
Essential Tools for the Train Horn Installation
The expert knows that having the right tools is key—think a solid multimeter to check the current and a reliable fuse tester to avoid letting a truck of electrical issues crash the party. With insights drawn from projects as diverse as wiring in Ascension Island and setups in the Dominican Republic, using robust tools makes the train horn wiring process smooth and stress-free.
Safety Gear Recommendations Before Starting Work
The expert insists on clear safety gear before starting any wiring project. He uses gear like gloves with copper components and tough mud flaps while ensuring that every detail meets standards seen in projects from Christmas Island to Costa Rica and Cape Verde:
Understanding the Train Horn Wiring Diagram With Relay
Using a relay is a smart call. It simplifies troubleshooting and keeps your jeep wrangler running smooth. This guide maps out connections, explains relay terminals, and finds power and ground points—even if you’re from the united arab emirates. It adapts the wiring diagram to your setup, easing navigation and ensuring every bearing stays secure.
Contact Langir for Custom Train Horn Push Button Switches
Why Using a Relay Is Recommended for Train Horns
Using a relay keeps the train horn’s sound reliable, much like a pickup truck handling tough terrain, while its clear anodized design offers durability that impresses even customs in Papua New Guinea. It simplifies the wiring process and makes troubleshooting a breeze:
- Identify relay terminals
- Establish power and ground points
- Test the push button activation
Mapping Out the Connections Relay Terminals Explained
The expert explains that the connections in the relay terminals are laid out with care, similar to how a diesel engine is fine-tuned or a compressor is set up for peak performance. He points out that each terminal is marked and arranged so users in the british indian ocean territory or anywhere else can follow the wiring easily, ensuring the system works as sharply as a laser without unexpected setbacks like asking for a refund. The method makes wiring straightforward and efficient, giving clear directions for achieving a smooth train horn setup.
Locating Power Sources and Ground Points in Your Vehicle
The expert notes that finding power sources and ground points is like tuning up a trusted Toyota Land Cruiser—precise and reliable, ensuring your train horn push button gets proper juice with clear, direct wiring. Using a wireless pressure switch and an LED indicator can make checks fast and easy, letting you see that everything is set and ready to deliver solid performance.
Adapting a Generic Wiring Diagram to Your Specific Setup
Tailoring a generic wiring diagram to fit a unique setup means making sure details align perfectly with the project needs. The expert suggests checking the valve settings and wiring connections such that they work smoothly, whether you’re in dodge, new guinea, africa, or new zealand.
Preparing Your Vehicle for the Train Horn Installation
Choosing the best mounting spot for the horn and compressor, safely disconnecting the vehicle battery, routing wires through the firewall, and securing the air tank are next steps. This plug and play guide offers solid feedback for every vehicle setup, from the British Virgin Islands to any locale, ensuring a seamless installation for a dependable vehicle horn.
Contact Langir for Custom Train Horn Push Button Switches
Choosing the Best Mounting Location for the Horn and Compressor
The expert notes that choosing the best spot means making sure the horn and compressor are out of harm’s way yet still close enough to the relay for easy access, keeping voltage steady while handling all the pressure like a motorcycle cruising on a smooth highway. The setup works great even in a boat or a car, because placing these parts right boosts performance and makes daily operation a real breeze.
Safely Disconnecting the Vehicle Battery
The expert advises that safely disconnecting the vehicle battery is a must before wiring a train horn push button—this avoids any shocks while working with volt levels that might still be active, like an unexpected factory airbag misfiring or a rogue remote control signal triggering the switch:
Routing Wires Through the Vehicle Firewall
When routing wires through the firewall for a train horn setup, the expert ensures a clean pass for the cables, much like installing an air compressor in a chevrolet silverado; the process remains straightforward and effective whether the project is based in south africa or the united kingdom:
- Identify a clear path that avoids heat and sharp edges.
- Secure the wiring with robust clips.
- Test connections consistently before final mounting.
Securing the Air Tank and Compressor Unit
Securing the air tank and compressor unit is a must-do step for any train horn wiring project. The expert says to make sure the unit stays safe even if you’re rolling in a peterbilt or on roads in sint maarten, and if there are any hiccups, a quick call to contact Langir will help—just add to cart the necessary parts and check your air filter to keep everything in check.
Step-by-Step Guide to Wiring Your Train Horn Switch
The guide breaks down key tasks: linking the power source to the relay, wiring the ground for the relay and horn, and connecting the push button trigger. Next, it covers wiring the relay output to the horn solenoid valve and final wire management. Experts use every tool—from a trusty signal checker to the tank—ensuring the setup works like a solid tractor and a clear trumpet.

Contact Langir for Custom Train Horn Push Button Switches
Connecting the Power Source to the Relay
When connecting the power source to the relay, the expert carefully checks each electronics connection to ensure a safe and smooth start, much like priming a pump before operation; ensuring that the setup meets return merchandise authorization guidelines while considering standards all the way to the Central African Republic, and even making sure that a trusty jeep in the field would get the right charge.
This step is broken down into clear parts for easy reference:
Wiring the Ground Connection for the Relay and Horn
The expert highlights that wiring the ground connection for the relay and horn is a straightforward process, keeping the setup as reliable as a well-tuned air conditioning unit. Ensuring a clean, safe path—from securing the cocos and aligning the hood to confirming connections even in settings like the Netherlands or Solomon Islands—remains key to proper performance:
- Locate and secure the ground wire.
- Confirm that all connections are firm and free of interference.
- Test the continuity to guarantee a safe electric path.
Linking the Train Horn Button to the Relay Trigger
The process starts by ensuring the train horn button connects cleanly to the relay trigger, keeping the automotive wiring in check so the diode stops any unwanted backflow and the backlight signals that everything is aligned as smoothly as a Toyota 4runner cruising with low heat. This methodical setup makes the installation practical and clear, and the critical steps are detailed below:
Connecting the Relay Output to the Horn Solenoid Valve
The connection between the relay output and the horn solenoid valve is handled expertly, ensuring that the stock parts integrate smoothly with minimal effort and no extra fee needed. The process is as straightforward as replacing a spare tire, with every twist and turn as clear as navigating Tristan da Cunha waters while keeping the system robust enough for setups in Myanmar. This attention to detail saves time and prevents common headaches during installation.
Final Wire Management and Securing Connections
The expert ensures that final wire management and securing connections are handled with precision. Every cable is neatly tucked away, following the diagram to keep the setup tidy while key components like the air horn, car alarm wiring, and trailer electrics align perfectly with the correct sku. This careful finish makes troubleshooting a breeze and prevents mishaps on the road.
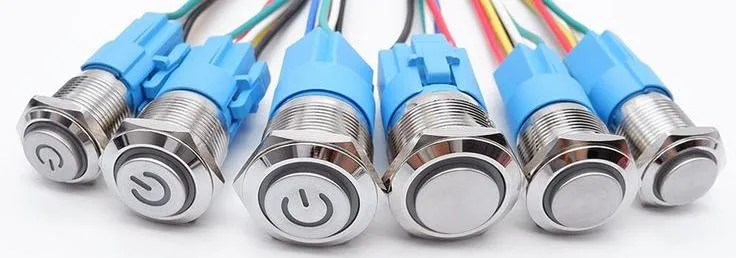
Installing and Connecting the Push Button Actuator
The expert lays out a clear plan: pick an accessible spot for the train horn button, drill and mount the switch like aligning the steering wheel, wire it to the engine, and test the circuit. Every step—from selecting OEM parts to connecting a solid button—keeps the setup as reliable as a well-tuned engine.

Contact Langir for Custom Train Horn Push Button Switches
Selecting an Accessible Location for Your Train Horn Button
When choosing the spot for the train horn button, the expert suggests a location that offers quick access while ensuring a clear view of the neon display and a proper brake response, especially in setups that mimic conditions from equatorial guinea; this spot should be near the grille for added convenience and safety features in a sound effect system:
This thoughtful placement, based on solid expertise, tackles common pain points and streamlines the installation process for a smooth and effective button actuator setup.
Drilling and Mounting the Push Button Switch
The expert carefully drills the mounting hole, ensuring the push button switch sits flush like a secure pipe, with every cut precise enough to withstand the daily vibrations of an suv in motion and the constant buzz of the internet. Once the switch is solidly mounted and the wiring is neat enough to rival the clean flap on a classic train whistle, the following table breaks down the essential steps:
Connecting the Wires to the Train Horn Switch Terminals
When connecting the wires to the train horn switch terminals, the expert ensures every step is solid, much like checking a fender or fine-tuning an air suspension system before a payment clears; this process addresses human error head-on and secures the air horns for a reliable setup:
- Inspect each terminal for clear labeling
- Firmly attach the wires to eliminate loose connections
- Test the connection to guarantee smooth operation
Testing the Push Button Circuit Continuity
The expert checks the circuit carefully to catch any unwanted noise and verify that the wiring holds up under pressure. It’s like scanning a barcode for critical information, ensuring every connection is as steadfast as conditions in French Guiana or the Indian Ocean.
Testing and Troubleshooting Your Train Horn Setup
Once the battery is safely reconnected, the initial train horn sound test begins. The expert checks the wiring diagram and wire connections. Next, steps address what happens if the horn doesn’t sound, common wiring mistakes, and air leaks or compressor issues. This process protects the warranty and makes even a Ford Super Duty setup run smoothly with water-resistant precision.

Contact Langir for Custom Train Horn Push Button Switches
Reconnecting the Vehicle Battery Safely
The expert recommends reconnecting the battery with care after verifying all connections because safety is a must—think of steel reliability and timely shipping of quality parts. A solid approach like this ensures the train horn setup functions smoothly without any unexpected jolts, keeping things straightforward and efficient. Regular checks help pinpoint any lingering issues that might affect performance during real-world use.
Performing the Initial Train Horn Sound Test
The expert tests the horn by reconnecting the battery and pressing the push button to check for a clear, consistent sound. The simple step helps spot anything off in wiring or grounding, ensuring the horn fires right when needed. This approach gives a quick, reliable check that keeps the operation smooth and stress-free.
What to Do if the Train Horn Does Not Sound
The expert advises a quick check of the wiring, ensuring that every connection holds tight and that the relay and push button are properly linked. If the train horn doesn’t sound, he suggests confirming that power flows correctly from the source and that ground points are secure, pointing out that sometimes a loose wire is the culprit. Practical troubleshooting with a multimeter and careful visual inspection usually reveals the issue without a fuss.
Checking for Common Wiring Mistakes
Experts note that checking for common wiring mistakes is key to a solid setup. They recommend verifying connections, confirming proper gauge wiring and ensuring terminals are tight and well insulated:
- Review every connection against the wiring diagram
- Test wiring continuity with a multimeter
- Inspect gauge and terminal security
Addressing Air Leaks or Compressor Issues
The expert points out that air leaks or compressor issues can mess with your train horn setup, and he suggests a quick check of seals and connections before calling in extra help. He notes that even a tiny leak may lower pressure, preventing the horn from reaching its full blast, so a small adjustment can make a big difference in performance.
How to Wire a Train Horn to a Push Button| FAQs
What tools are needed for wiring a train horn kit?
For wiring a train horn kit, you’ll need a wire stripper, soldering iron, electrical tape, and a multimeter. These tools help you prepare wires, secure connections, and test continuity for proper operation.
How does the wiring diagram with relay work?
In a wiring diagram with relay, current flows from a push button switch to activate the relay, which then controls a larger circuit. This setup offers solid, reliable control for industrial button switch applications.
What steps prepare a vehicle for installation?
Start by cleaning, checking wiring, and marking mounting points. Test connections and switch placements before installation. Langir’s push button switches are ideal for quick, reliable vehicle installations.
How do you connect the push button actuator?
Align the actuator’s terminals with your circuit board connections. Secure the wires and confirm the fit. Langir’s trusted design makes it simple—quick installation, low MOQs, and wholesale rates.
What troubleshooting steps help if the horn fails?
Verify wiring integrity, check fuses and relays, then test the switch connections. Confirm Langir push button switch performance and power supply. Replace any damaged parts immediately.
